

Welcome back! In the last post, I walked you through creating a custom button in GENESYS that moved an entity from its current folder into a new folder named after that entity and moved any descendant entities along with it. This little helper function can make organizing your model organization much easier by automating a task that previously was very manual. I always use this little helper button when I’m working in GENESYS!
In this post, I’m going to finish what we started by going through the code you pasted into the code editor and then assigned to a custom button. We’re going to explore each command, and hopefully, by the end of this article, some of the basics of writing scripts in GENESYS will be a bit clearer for you. Writing scripts in GENESYS shouldn’t be something you fob off on a “software developer,” it’s something that the Systems Engineer can leverage to make the modeling process in GENESYS easier for their team and build customized outputs that show the power of the Model-Based Systems Engineering process.
Note that for this example, we’re using Visual Basic (VB), most of the GENESYS provided example scripts are in VB, but if you’re more comfortable with C#, you can also use that language to code scripts.
Let’s take a deeper look at the code I had you paste into the code editor in my previous post. GENESYS sets up the entry code for you. Since we started with an existing script – the “SelectedEntitiesSample” (which, by the way, is an excellent entry script for a lot of different little utilities like this one!) – you have some pre-existing code to work with. Let’s start with that.
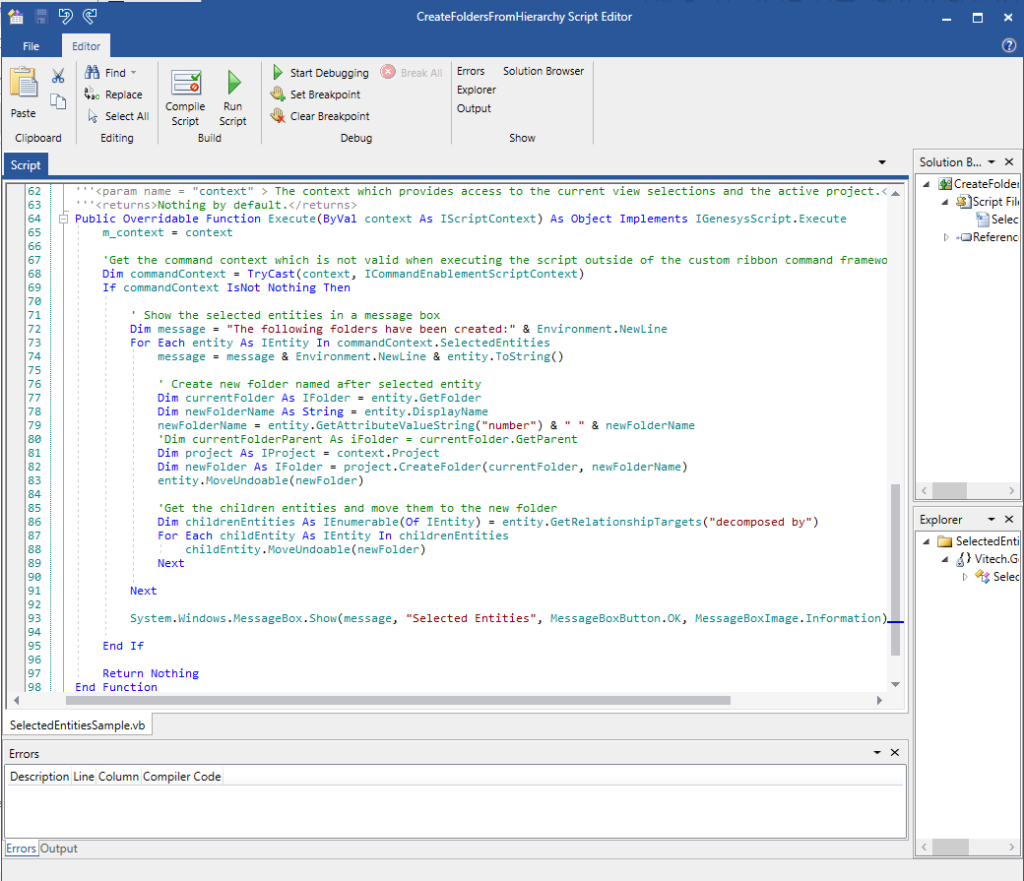
Our custom code will always be placed in the Execute function (line 64 above). This is the entry point to the new code. When your button is executed, this is what that calling code is looking for. The rest of the code created in the script editor is developed by GENESYS and sets everything up for you.
![]()
This Execute function is public – meaning it’s available for other calling functions. They can see it and use it. It accepts the context in which it’s run as an input. In most cases, this context is in the execution of the script when the user selects the custom button. This gets into more of how GENESYS operates under the hood than is needed for this discussion. Just understand that this is the entry point, and GENESYS passes control to this function. The next line of code assigns the context that we accepted into the function to a member variable (that was set up automatically by GENESYS in the code above the Execute function.)

The next couple of lines of code (68 – ?) are a little in the weeds, but what’s going on here is a check by GENESYS to ensure that the context of this command is valid within the custom ribbon command framework provided by GENESYS. This ensures that this script is being run through the proper context. If it’s not, the code is skipped, and control is returned to GENESYS. A few quick notes, though, is that the “IsNot Nothing” keyword is useful, so you can use it to test for empty objects. “Dim” is a keyword to dimension a variable. Basically, it just tells VB to create a new variable.
![]()
Next, we create a message string that we will display to the user through a text box. We’ll be adding to this message string as we create the new folder.
![]()
Now for the essential part, we have to iterate through the entities we selected in the Browser panel. To do this, we use a simple “For” loop that assigns one of our selected entities at a time to the “entity” variable we declared in our loop declaration. The “commandContext.SelectedEntities” is what’s holding our selected entities from the browser. Now we have a loop that allows the processing of every selected entity.
Notice the “As IEntity” part. “IEntity’s” is a container for a GENESYS Entity – i.e., a function, a component, or whatever entity is selected in the Browser list. This “IEntity” object has a defined set of properties and methods that can allow interactions with the “IEntity.”
To step away from our code, walk here for a moment; this is an excellent opportunity to discuss the GENESYS API Help file. If you open the help file in GENESYS, you’ll find the API Reference at the bottom of the contents list. This Reference file contains all the interface and class definitions you can use in scripts or your API applications. The most common place to start is the IEntity Interface. The API reference calls out all the properties and methods you can use with the different types of objects you can work with in GENESYS.
![]()
Ok, back to our code, the next step is to query the entity for what folder it’s in and then return that folder to a folder object. We need to know where the entity is in the folder structure, so we can create a new folder underneath it and move our entity into it. Again here, you can use the API reference in the help file to get information on the “IFolder,” and the method to get the folder from the entity (“entity.GetFolder”).
![]()
We then need to create our new folder. The first step in this process is to get the name of the selected entity using the “.DisplayName” method, which will return the entity’s name to our “newFolderName” variable. We’ll then do a little string manipulation to get our new folder name the way we want it by querying the entity for its number attribute, then concatenating the returned number with the name of the Entity we stored in the “newFolderName” variable. Simple right?
Now that we have our new folder name created, we’re ready to create the folder. What would happen with this code if no number attribute was filled in? In this case, we’d be ok; we’d have a leading space before the folder name. Perhaps we should have performed a check to see if the number attribute was empty or not. If it was empty, we could use a simple if statement to construct a slightly different string for the folder name – one that excludes the space (“ “) that was meant to build in the space between the number and the name… Perhaps this would be an excellent place to try and build this logic yourself if you’re feeling up for it.
![]()
Now we need to create the new folder and move the entity into the newly created folder. The method used to create a new folder is a project method, so we need to perform that method on a project object. We query the context to return the project object. Then we can use the “.CreateFolder” method to create our new folder, and we assign it to a newFolder variable. The “.CreateFolder” method requires two parameters: the starting folder and the new folder’s name. In this case, the starting folder is our currentFolder that we captured in a variable a few lines of code earlier. Finally, we call the “.MoveUndoable” method our entity to move it into the newFolder. We can use the API helpfile to know that there is a “.MoveUndoable” method available for entities. Here’s what it looks like:

At this point, we’ve created a new folder and moved our entity into the folder, what’s next? Let’s move any child entities of the selected entity into the new folder too!

Here we see how we can get a list of relationship targets by using the “.GetRelationshipTargets(“relation we want”)” method of the entity. This method returns an “IEnumerable” object which is the enumerator of a simple iteration over a collection of objects (the returned target entities in this case). Now that we have this collection, we need to loop through the entities it contains with a simple “For” loop. In the loop with each entity, we perform the “.MoveUndoable” command again to move them to the “newFolder.”
Is there something that’s not necessarily wrong in the code above but, at the very least, limiting? Any guesses? Well, don’t worry! I’ll tell you. The code above is pulling the targets of the “decomposed by” relation, but what about other classes of entities that don’t use the “decomposed by” relation to form a parent-child relation, such as a component class entity using the “built in/built from” relation? This means that this example code will only move decomposing functions. If we run this command on components, it will create the folder and move the selected entity, but it won’t move any child entities into the new folder.
We have built fragile code here! Shame on me! To build a more robust script, we’d want to build in some logic to figure out what class we’re dealing with and then return its decompositional relation to our query. Perhaps a future upgrade?

We then loop back around to perform these actions again on any other selected entities. Once the loop is finished, the final step is to publish our message to a text box that displays all the actions taken – remember, we were building this message string with every trip through the loop!
I’ve now taken you through the setup of running your custom command script and walked you through the code. I hope that in this post, I have demystified the code a little bit in GENESYS. It’s not scary and provides so much flexibility and increased capabilities to the Systems Engineer. One thing I love about GENESYS is that its API allows so much flexibility, both in using the tool and in building outputs. There’s no limit to what you can do with a good knowledge of the API and Model-Based Systems Engineering in GENESYS! Create your modeling helper utilities, create your custom outputs, and create your connections! The power is all there for you.


