


Configuration management is an important concept that’s often misunderstood in the GENESYS context. Users tend to be familiar with the concept of checking out files, merging, resolving conflicts and then creating a baseline for the rest of the team to work from with their changes incorporated. This process works great for flat file-based collaborations such as developing software. Different methodologies have grown up around this need, such as Git or Subversion. Many GENESYS users are very familiar with these tools and methods, which is why we often get questions on configuration management.
GENESYS was designed to be a collaborative toolset that allows many users to interact with each other concurrently through the database. Through this intrinsic collaboration, model-based systems engineering is accomplished through the sharing and continual refinement of the central repository.
The GENESYS technology is based on a central SQL database that allows live collaboration between all users working on the same project. This is fundamentally different than the concept behind a GIT repository, where branching occurs and allows users to make changes to a copy of the files in their own repository, then merge the changes back to the main trunk line.
GENESYS is based on a different methodology, which makes it difficult to support this branching and merging concept. That being said, GENESYS does support baselining and revisioning of the entities in the database, and the entire database itself, along with a few other methods to enable effective configuration management.
Now that we’ve established that GENESYS is not based on GIT or some other distributed version control system, let’s explore some of the best practices for configuration management in GENESYS. At certain times in the design lifecycle, deliverables to the customer are due, and this is usually the best time to baseline your GENESYS project and archive a copy. This archival copy is necessary to capture the state of the database at the point in time where you’ve developed deliverable outputs. At this point, this archived copy can be checked into a bigger Program Lifecycle Management (PLM) tool for program compliance.
Most users are familiar with the concept of exporting a GENESYS file that is archivable through the export function available in GENESYS. This is exactly how you’d perform the output snapshot of the GENESYS project for archiving by a PLM tool. Simply export a project baseline from the export menu option, then check in the resulting .gnsx file to the PLM tool. Simple.
Now that you’ve archived a copy of the GENESYS database to an external tool, how do you manage the baselining process internally in GENESYS? Good question! Here you have many options, and which option you choose is entirely based on your organizations needs. First, let’s cover the basics of what revision data GENESYS stores, and what the differences are so that we have a common language to discuss the options for baselining going forward.
GENESYS performs three different types of revision tracking behind the scenes. These are: change history, audit logging, and versioning. Let’s briefly explore the differences between these three concepts in order to set the stage for baselining concepts.
Change History:
This is the recorded change log at the database level—in other words, the non-human readable log of all the changes occurring in the database. When collaborating with a distributed team where a GENESYS server is not available, tracking merge history allows team members to work in parallel, and then integrate their changes. Note: that history is not affected by the baselining process. History clearing is only controlled through the export function in GENESYS as an option to export the database and clear its history. Part 2 of this blog will go into more depth on history and merging changes.
Audit Logging:
Audit logging maintains a basic textual log of all changes made, along with a timestamp and responsible user. Audit logs are stored in the Audit Log attribute on the Properties tab. Audit logs are “read only” and provide insight into the evolution of the entity. Audit logs are limited to 100 entries per entity, and after that’s exceeded, the entries are automatically trimmed to the last 50 entries.
Versioning:
Versions of certain attributes and parameters are kept, and can be restored to any captured version. Versioning allows the user to revert back to a certain value, if desired.
Now that we’ve defined these basic concepts, we can take a look at how each of these is affected by the different baselining options and user choices.
GENESYS offers a few different options when baselining a project. GENESYS can renumber the project baseline through a revision of the project, a variant of the project, or a release of the project. When the Baseline Project command in the Project menu is chosen, GENESYS provides options for revision number, allows the user to add a description of the baseline, and then prompts the user on whether or not they want to clear the Audit Logs and create a duplicate baseline project. If the “create duplicate project” selection is made, GENESYS will also prompt the user to retain all current permissions, or shift the permissions of the newly duplicated project to read only—and the administrator accounts still retain full access.
Let’s start with the simple concept of revision. In a revision of the database, the version number is incremented .1, the version data is cleared and set to baselined, and the project can then move forward using the new revision number and baselined versions.
Remember, if you don’t create a duplicate of your project, the original project version 1.0 will keep moving forward as 1.1. The best practice is to allow GENESYS to duplicate the baselined project and shift it to a “read only” status. This will allow an archival version of the project to remain on your GENESYS server for “read only” use by your users. Clearing the audit logs is a choice that is up to the individual user/organization. Baselining time does provide a useful checkpoint to clear the Audit Logs so that going forward, all you see in the Audit Logs are the changes from the baseline.
The key takeaway here is that anytime you baseline, the versions are cleared and set to baselined.
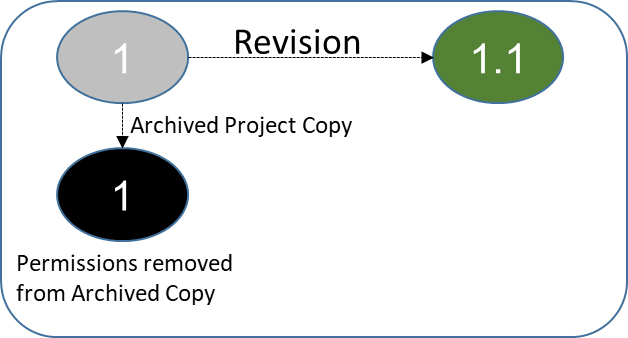
Figure 1. Revision Baseline
The next concept is a variant baseline. A variant is simply a version of the revision baseline. If you want to spin off a variant of the baselined version, you can use this setting and it will increment the project number by .0.1, and again, it’s best practice to duplicate the project you’re baselining and remove permissions.
In this example, we’ve re-versioned our original database, archived a copy of the project, and then created a couple of different variants, utilizing variant 1.1.0.2 as our main “going forward project” for the team. If another team member decides to continue working in a variant, keep in mind they would be working in a separate project, so changes made in one variant will not be seen in the other variant. It is possible to manage the variants throughout the history though, and re-merge the history file into the main repository, as long as it is managed carefully! (More on this in Part 2.)
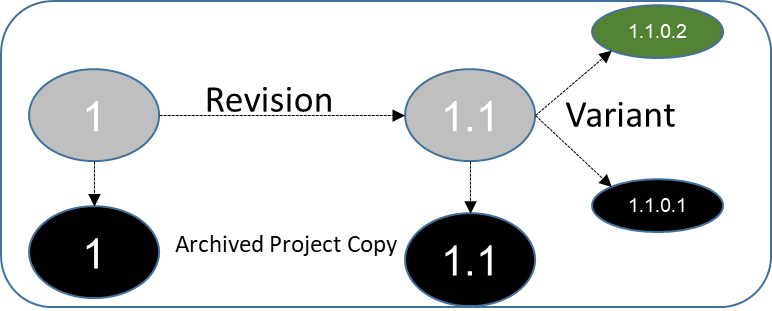
Figure 2. Variant Baseline
Finally, we can choose to select the full release numbering, which will increment the major revision number. We simply archive away the variant that served as our baseline, and continue working in our newly baselined Release 2.0 project. Again, it’s best practice to duplicate the existing project and remove permissions, so a copy is retained in the database.

Figure 3. Release Baseline
To recap our journey through this example projects baseline history, version number of our same master project have been changing, at each baseline we’ve been clearing the versions, and possibly clearing the audit logs (based on your decision to clear them at baselining). At this stage, our users are all working in Version 2.0, and we have a Version 1.0, 1.1, 1.1.0.1 and 1.1.0.2 on our GENESYS server with permission restricted to just the administrator level, preserving the state at each point the baseline was executed.
So far, we’ve covered the concepts behind baselining at the project level. GENESYS also allows you to baseline individual entities, relationships, folders, and packages. Baselining at that level does the same as at the project lever—it clears the version history for each selected entity. This feature can be useful later on in a project if there are portions of the model that can be baselined independently of the entire project. Typically, baselining the entire project is the best practice, although baselining individual pieces of the project can become difficult to manage.
I hope this brief introduction to baselining has been helpful. Having your team working collaboratively in a GENESYS project is by far the best way to perform model-based systems engineering. However, this isn’t always possible, so Part 2 of this blog will go into more depth on best practices for dealing with change history, merging and managing offline users.
To learn more about GENESYS, visit: Experience Collaborative Product Design for the Digital Enterprise.


thanks for the post. This reflects how we’ve implemented CM with our GENESYS model so far. We’re also doing CM of artifacts of the model because of our culture. One thing we’re hung up on is how to do CM now that we have two models that are connected together through cross-project linking. We only have one server and having multiple revisions and variants of each of the two models on the server violates some of the relationship rules (e.g. can’t connect a link to more than two objects). If you could touch on this in Part 2 or offline, we’d appreciate it!