


Welcome back to my discussion on configuration management in GENESYS! In my last post on this subject I went through a couple of different concepts, starting with the different levels of data that GENESYS is tracking in regard to changes, then onto the concept of baselining and finally revisioning your data. Now, onto another common issue of configuration management that a lot of GENESYS users run into and ask questions about. What happens when you’ve got users who are disconnected from the main repository? How can you ensure their changes are incorporated into the main repository and they stay in sync with the other users? Quite often there are business or organizational constraints in place that keep some users from having direct access to your GENESYS repository.
When using GENESYS the preferred way for users to interact with the model is through the use of a central repository. This central repository is often hosted on a dedicated server, allowing the users to simultaneously work in the same model. This allows users to see the changes made by other users in near real time, and promotes effective collaboration in the development of the model. While this is the preferred method, it’s not always possible for distributed teams, or teams with multiple organizations involved to effectively use a centrally served repository.
So, how do we best manage these asynchronous users? There are a few steps you can do to enable this change/update cycle effectively. The first and most important thing to do is to set up a schedule. You will need to get into a scheduled rhythm to make this entire process run smoothly and efficiently.
The interval needed for this change/update cycle is dependent on the organization’s needs. If you’re not making a lot of changes, or your distributed members aren’t likely to make a lot of changes, you can choose a longer interval to go between performing the change/update cycles. If your distributed team is making a lot of changes, and you’re working in a fast-paced environment then a shorter change/update cycle will be needed. In my experience, for a team actively developing a systems model a weekly change/update interval is the longest you would want to go between starting and closing the cycle. If you stretch the interval out farther you increase your risk of having to deal with merge conflicts.
What else needs to be done to best prepare for managing offline users? Simply put, plan the work to be done. Divide the work explicitly and make sure the offline users understand their assigned scope of the work to be done. The more explicitly you can divvy up the work, the less likely that you’ll be stepping on another engineer’s work. Typically, this is just best practice in general when modeling in a common repository.
Each engineer should have an assigned area or responsibility in the model to work on. Of course, where one engineer’s part of the model interfaces with another’s coordination must occur. These interfacing entities tend to be where the conflicts occur, and the best way to avoid them is to make sure the team is communicating (easily said, difficult to do, I know…). To steal a good quote from the GENESYS help file on this topic, “In other words, all system engineering efforts should start with a good set of policies and procedures. The use of an automated systems engineering support tool does not negate the need for such practices”.
There are 6 discrete steps needed to make this process work, let’s take a look at them graphically:
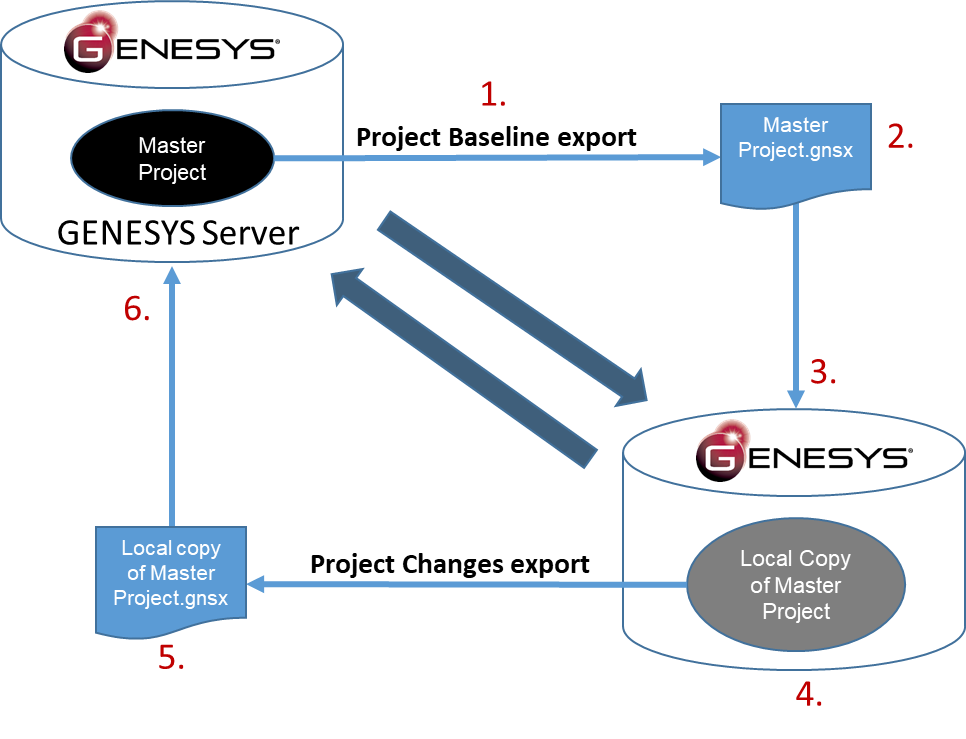
Figure 1. Offline Model Management
Step1: Export master project – Use “Project Baseline” export option
This first step is performed by the administrator of the main database, and is simply an export of the baseline of the master project. The export should use the “Project Baseline” export option which will output the baseline .gnsx file. This file can then be distributed to the external team members. You are in effect creating a copy of your master database and you will distribute this copy to your asynchronously working team members. The “Project Baseline” option is used because it clears the history after the export, this is crucial in that it allows only the user’s changes to be tracked from the export on. In essence, each time you start this cycle you’re performing a minor baseline. For a weekly update cycle, this should be done either late Friday afternoon or very early Monday morning by the administrator.
Step 2: Distribute the exported *.gnsx file to the team
This file needs to be distributed to the team members through whatever file transfer protocol is appropriate for your organization. This is the easiest part! The users should expect this file by the agreed upon time and understand they cannot do any work on the model until they receive this new update.
Step 3: Import the master project.gnsx file into GENESYS on the local machine, or server used by the team working asynchronously
Each distributed team member now needs to import the provided .gnsx file. They key thing here is to make sure the file is imported into a new project, do not import this new baselined file into an existing repository, remember tracking changes in this new import is crucial to making this process work!
It’s worth noting, that if an offline group has multiple users, they can perform this process with the new baseline installed on a server if that makes sense for them.
Step 4: Work!
(to the tune of the “We dig, dig, dig, dig” from Snow White and the 7 Dwarves)
“We model model model model in our tool the whole day through
To model model model is what we like to do
It ain’t no trick to get systems engineering done quick
If you model model model with an MBSE tool
In a model! In a Model! In a model!
Where a million pieces of related data shine!
During your mining, (cough) I mean, systems engineering efforts, GENESYS is keeping track of the changes you’re making to the imported baselined project. Do not manually erase the merge history, this is needed to keep the change history complete.
Step 5: Export the extended system model
At the agreed upon interval each member of the distributed team that’s made changes needs to export their project using the “Project Database Changes” export option in the export menu. This option generates a file that contains just the changes from the baseline you started with. The asynchronous users should then provide this exported file to the database administrator responsible for keeping the main repository.
Step 6: Import the change files
At this point the administrator has received all the change files from the distributed team members and is ready to merge the changes back into the main repository. The administrator will take each individual file and import into the master repository and then start the cycle over again by performing step 1.
Of course, during this merging process, conflicts can occur. As GENESYS encounters any conflicts, they are logged in a separate text file that is displayed to the administrator upon completion of the import. Merge conflicts usually occur over entity naming issues. For example, if two different users create an entity with the same name, GENESYS will detect this duplication and flag it. GENESYS will import the 2nd copy of the entity, give it a unique name and notify the administrator what the name of the duplicated entity was. At this point the administrator will have to work through the actual change needed with the distributed team members and then manually update the project. As you can imagine, avoiding these conflicts as much as possible is the better way to go.
When dealing with asynchronous users, the proper pre-planning of the effort, attention to detail and sticking to a scheduled change/update rhythm are crucial to avoid conflicts and make the process as seamless as possible. Your GENESYS administrator is the key person in making this process work. They have control of the process, and they’re the one responsible for working through any conflicts that occur as part of the merging process. Each of the asynchronous users has the responsibility to get the latest update at the beginning of the change/update cycle, create the new project for their updates and export their change file for the administrator to merge with the main project. In order to keep this processing working smoothly, keep the communication between users and your administrators going and you’ll be able to manage asynchronous users effectively.


